|
|
|
Table Saw Test 4
Checking the Rip Fence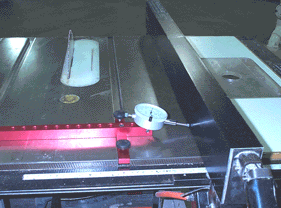 One
of the most frustrating things about using a table saw can be using an
inaccurate and inconsistent rip fence. I can remember how aggravated I used to
get "pounding" the fence on my Sears into what I thought was a good
alignment, and then still get saw marks and burns on the boards that I was
ripping for my projects. One thing that I learned long ago is that you can’t
expect to get a good rip cut on your table saw if your fence won’t stay
properly aligned and doesn’t meet these requirements:
One
of the most frustrating things about using a table saw can be using an
inaccurate and inconsistent rip fence. I can remember how aggravated I used to
get "pounding" the fence on my Sears into what I thought was a good
alignment, and then still get saw marks and burns on the boards that I was
ripping for my projects. One thing that I learned long ago is that you can’t
expect to get a good rip cut on your table saw if your fence won’t stay
properly aligned and doesn’t meet these requirements:
|
The following procedure will allow you to check the straightness of the rip fence face.
With the A-LINE-ITÔ positioned in the guide slot as shown in the photo above, the dial indicator should be rotated (and locked) into a position that places the tip of the indicator about ½" above the surface of the saw.
With the saw blade lowered below the surface of the saw, slide the A-LINE-ITÔ toward the front of the saw, and position the rip fence in a location that makes the pointer on the dial indicator move 1 or 2 revolutions on the scale. You do not need to lock the rip fence at this time.
Zero the dial indicator, and slide the A-LINE-ITÔ to the rear of the saw. Note the reading on the indicator, and try to shift the position of the fence at the rear to "zero" without moving the fence at the front. Re-check the reading at the front, and readjust the fence until these readings are within .002".
Re-position the A-LINE-ITÔ to the front of the saw, and reset the zero, if necessary.
Slide the A-LINE-ITÔ toward the rear, noting the direction the pointer on the dial indicator moves as you slide it along the fence face. If your rip fence face isn’t perfectly straight, one of two things will happen:
If the indicator starts at zero, goes negative (below zero) in the middle, and returns to zero at the rear of the saw, the face of the fence has a "cup" in it. (The fence is bent away from the blade in the middle.) If this is the case, almost every board that you run against the fence will be cut on the teeth of the blade at the front of the saw, and will then be pushed onto the teeth of the blade at the rear of the saw. This will result in burns, blade marks, and a tendency for the board to lift upward at the rear. (This is also a sign that kickback isn’t far off!)
If the indicator starts at zero, goes positive (above zero) in the middle, and returns to zero at the rear of the saw, the face of the saw has a "bow" in it. (The fence is bent toward the blade in the middle.) If this is the case, boards will appear to be "pulling away" from the fence at the rear. This means that you will still be burning your cuts, as you are still making contact with blade teeth on the way up out of the saw. Other problems created by this situation may be that your dimensions may vary slightly from board to board, and the cuts may not be perfectly straight (since the material is not making contact with the face of the fence consistently through the cut. This will be most obvious if you are ripping stock that is being prepared for "glue-up".
What can you do to straighten a bent fence? If you don’t have a surface plate and an arbor press, I would recommend that you try to straighten the fence in one of two ways:
, I would recommend that you remove it from the fence. Thoroughly clean both surfaces of the face and fence to make sure that sawdust has not accumulated between them, and reinstall the face onto the fence. If a retest shows there is still a problem, I would recommend that you "shim" between the fence and fence face as required.
If the fence has a replaceable face
, I would add one. I would recommend a high quality plastic, such as ½" thick UHMW for this application. Make sure that any hardware needed was countersunk to clear the face of the face, and shim between the fence and face as required. If the fence does not have a replaceable face
When shimming the fence, use different thickness shims fairly close together along the problem area to straighten the face of the fence. This will keep the fence face rigid, so it won’t bend as boards are pushed against it.
The following procedure will allow you to check the alignment of the rip fence.
Position the A-LINE-ITÔ in the guide slot as described earlier in steps 1-2, but lock the fence before you zero the dial indicator at the front of the saw.
Slide the A-LINE-ITÔ to the rear of the saw, and note the reading.
NOTE: There are different philosophies as to how the rip fence of the saw should be positioned. Some people say that the fence should be absolutely parallel to the saw blade, while others (myself included) say the fence should be slightly "open" at the rear. I prefer this because a fence that is parallel to the blade will have the blade teeth making contact with the wood toward the rear of the saw. This will result in burning of the cuts, and even kickback if the board you’re cutting tends to "cup" as it being ripped. By adjusting the fence slightly open across the length of the blade, any tendency to burn will be on the edge of the board on the opposite side of the saw blade, away from the rip fence. If I get a burn on this edge, I normally clean it up on my jointer before I rip it to dimension anyway, as I’ll do almost anything to avoid sanding out saw marks & burns.
Regardless of how you decide to align your fence, you must consider the alignment of the saw when performing a fence alignment. Let’s say that while you were performing the alignment on your saw, as described in Table Saw Test 3, that the reading taken at the rear showed that the blade was only .002" further away from the guide slot than it was at the front. Let’s also say that the blade was elevated to a height that allowed the A-LINE-ITÔ to move 7 ½" along the guide slot when we took readings at the front and rear of blade rotation.. Considering the average (full size) table saw has a 27"-28" deep top, this would mean that the fence would need to be .008" further away from the guide slot at the rear of the saw than it was at the front, just to be parallel to the saw blade. For this reason, you must take saw alignment into consideration when performing a rip fence alignment, and insure that your saw is aligned as close to perfect as possible. If it isn’t, it’s very hard to properly align your rip fence.
If the dial indicator goes positive (above zero) at the rear of the saw, the fence is closer to the guide slot at the rear than it is at the front. If this is the case, you should make adjustments to the fence as soon as possible. This reading indicates that the boards are being "pinched" between the fence and saw blade (at the rear), and may be lifted by blade rotation. If this is the case, "kickback" becomes a real possibility.
If the dial indicator goes negative (below zero) at the rear of the saw, the fence is further away from the guide slot at the rear than it is at the front. This is a much more favorable position to be in than to be "pinching" the boards between the blade and fence, as the chance of kickback is reduced. I would recommend that you try to adjust your fence so that is "open" enough at the rear to give you .001"-.002 " clearance at the rear of the saw blade.