|
|
|
Jointer Test 1
Checking Knife Position Changing
jointer knives can be one of the most frustrating operations in a woodworking
shop. Obviously, dull knives should be replaced; not only to improve the quality
of the cut the jointer makes, but also for safety reasons. You are greatly
increasing the possibility of kickback if you leave dull knives on your jointer.
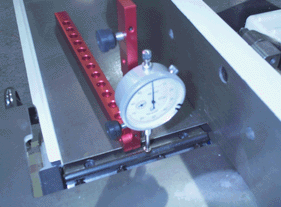
The photo to the left shows the A-LINE-ITÔ assembled to check jointer knife position. Please note the wide, flat tip has been installed for this purpose.
The following procedure will allow you to check knife position on a jointer.
Assemble the A-LINE-ITÔ as shown in the photo above, with the wide, flat tip installed.
With the A-LINE-ITÔ positioned (near the center of the head) on the outfeed table of the jointer, zero the dial indicator.
Slide the A-LINE-ITÔ forward to position the tip of the indicator near the center of the head.
Slowly rotate the head, and slide the A-LINE-ITÔ to make contact between a knife and the dial indicator tip.
Observe the pointer on the dial indicator.
NOTE: As you rotate the head, the pointer will go positive, reach a "high spot", and then start to go negative. The "high spot" was top-dead-center, (TDC) the highest point in rotation. It is at this point where you need to secure the head, and set the knives level with the outfeed table of the jointer. If the knife is very high or very low in reference to the outfeed table, you should adjust it close, and then repeat the steps above.
6. Once you have set the first knife, repeat the procedure on the remaining knives.
Return to A-Line-It On-line Manual Main Page